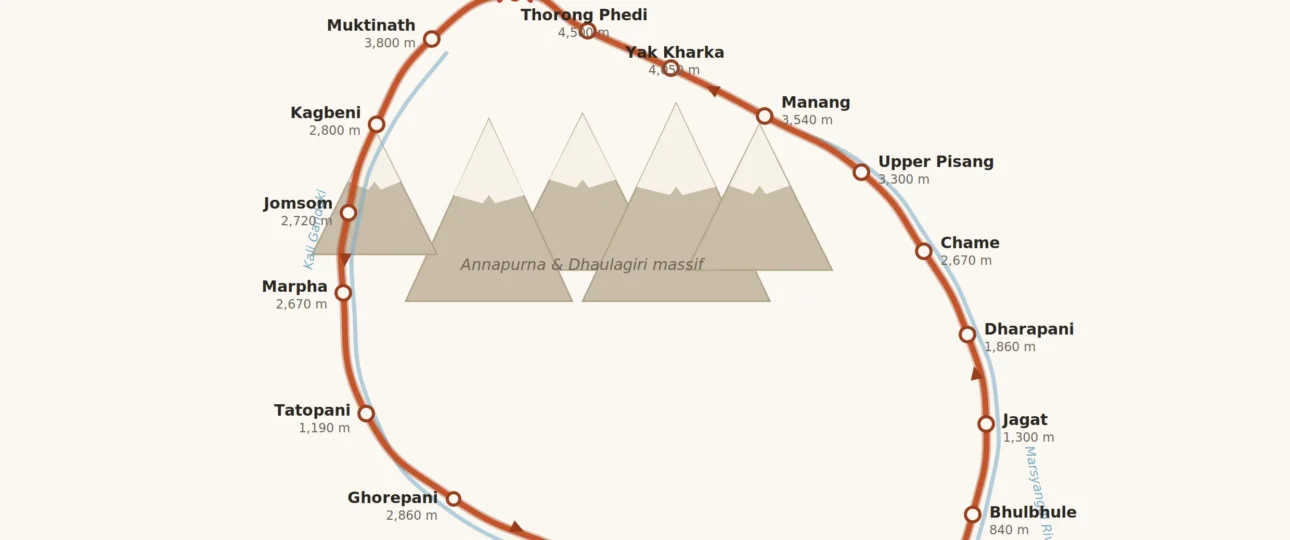
Annapurna Circuit Trek Map
The Annapurna Circuit is a loop around the Annapurna massif in central Nepal. On a map it looks deceptively simple: a line that climbs up the Marsyangdi valley in the east, crosses a single high pass called Thorong La (5,416 m / 17,769 ft), and comes down the Kali Gandaki valley in the west toward Pokhara. The detail that actually decides your trip is hidden inside that line: which villages you pass, how fast the ground rises, where the road now reaches, and where you should stop to let your body catch up with the altitude.
This guide turns the map into something you can plan from. You will get the route in order, the elevation of each key stop, realistic distances and walking times, where roads have changed the classic trail, and how to read the whole thing before you commit to an itinerary. Where figures vary between reliable sources, the ranges are given honestly rather than pretending there is one exact number.
What the Annapurna Circuit trek Map actually shows
A good circuit map communicates five things at once. Read it in this order and it stops being confusing:
- Direction of travel. The circuit is almost always walked clockwise — up the Marsyangdi valley from the southeast, over Thorong La, and down the Kali Gandaki toward the southwest. Counter-clockwise is possible but rarely done, because climbing to Thorong La from the Muktinath side means a much longer, steeper ascent on pass day and a harder altitude profile.
- The single high point. Thorong La sits near the top-centre of most maps, usually flagged with a warning marker. Everything before it is a build-up; everything after is a descent.
- Village sequence. The named settlements are your daily targets, your food and your beds. Their order matters more than the exact kilometres between them.
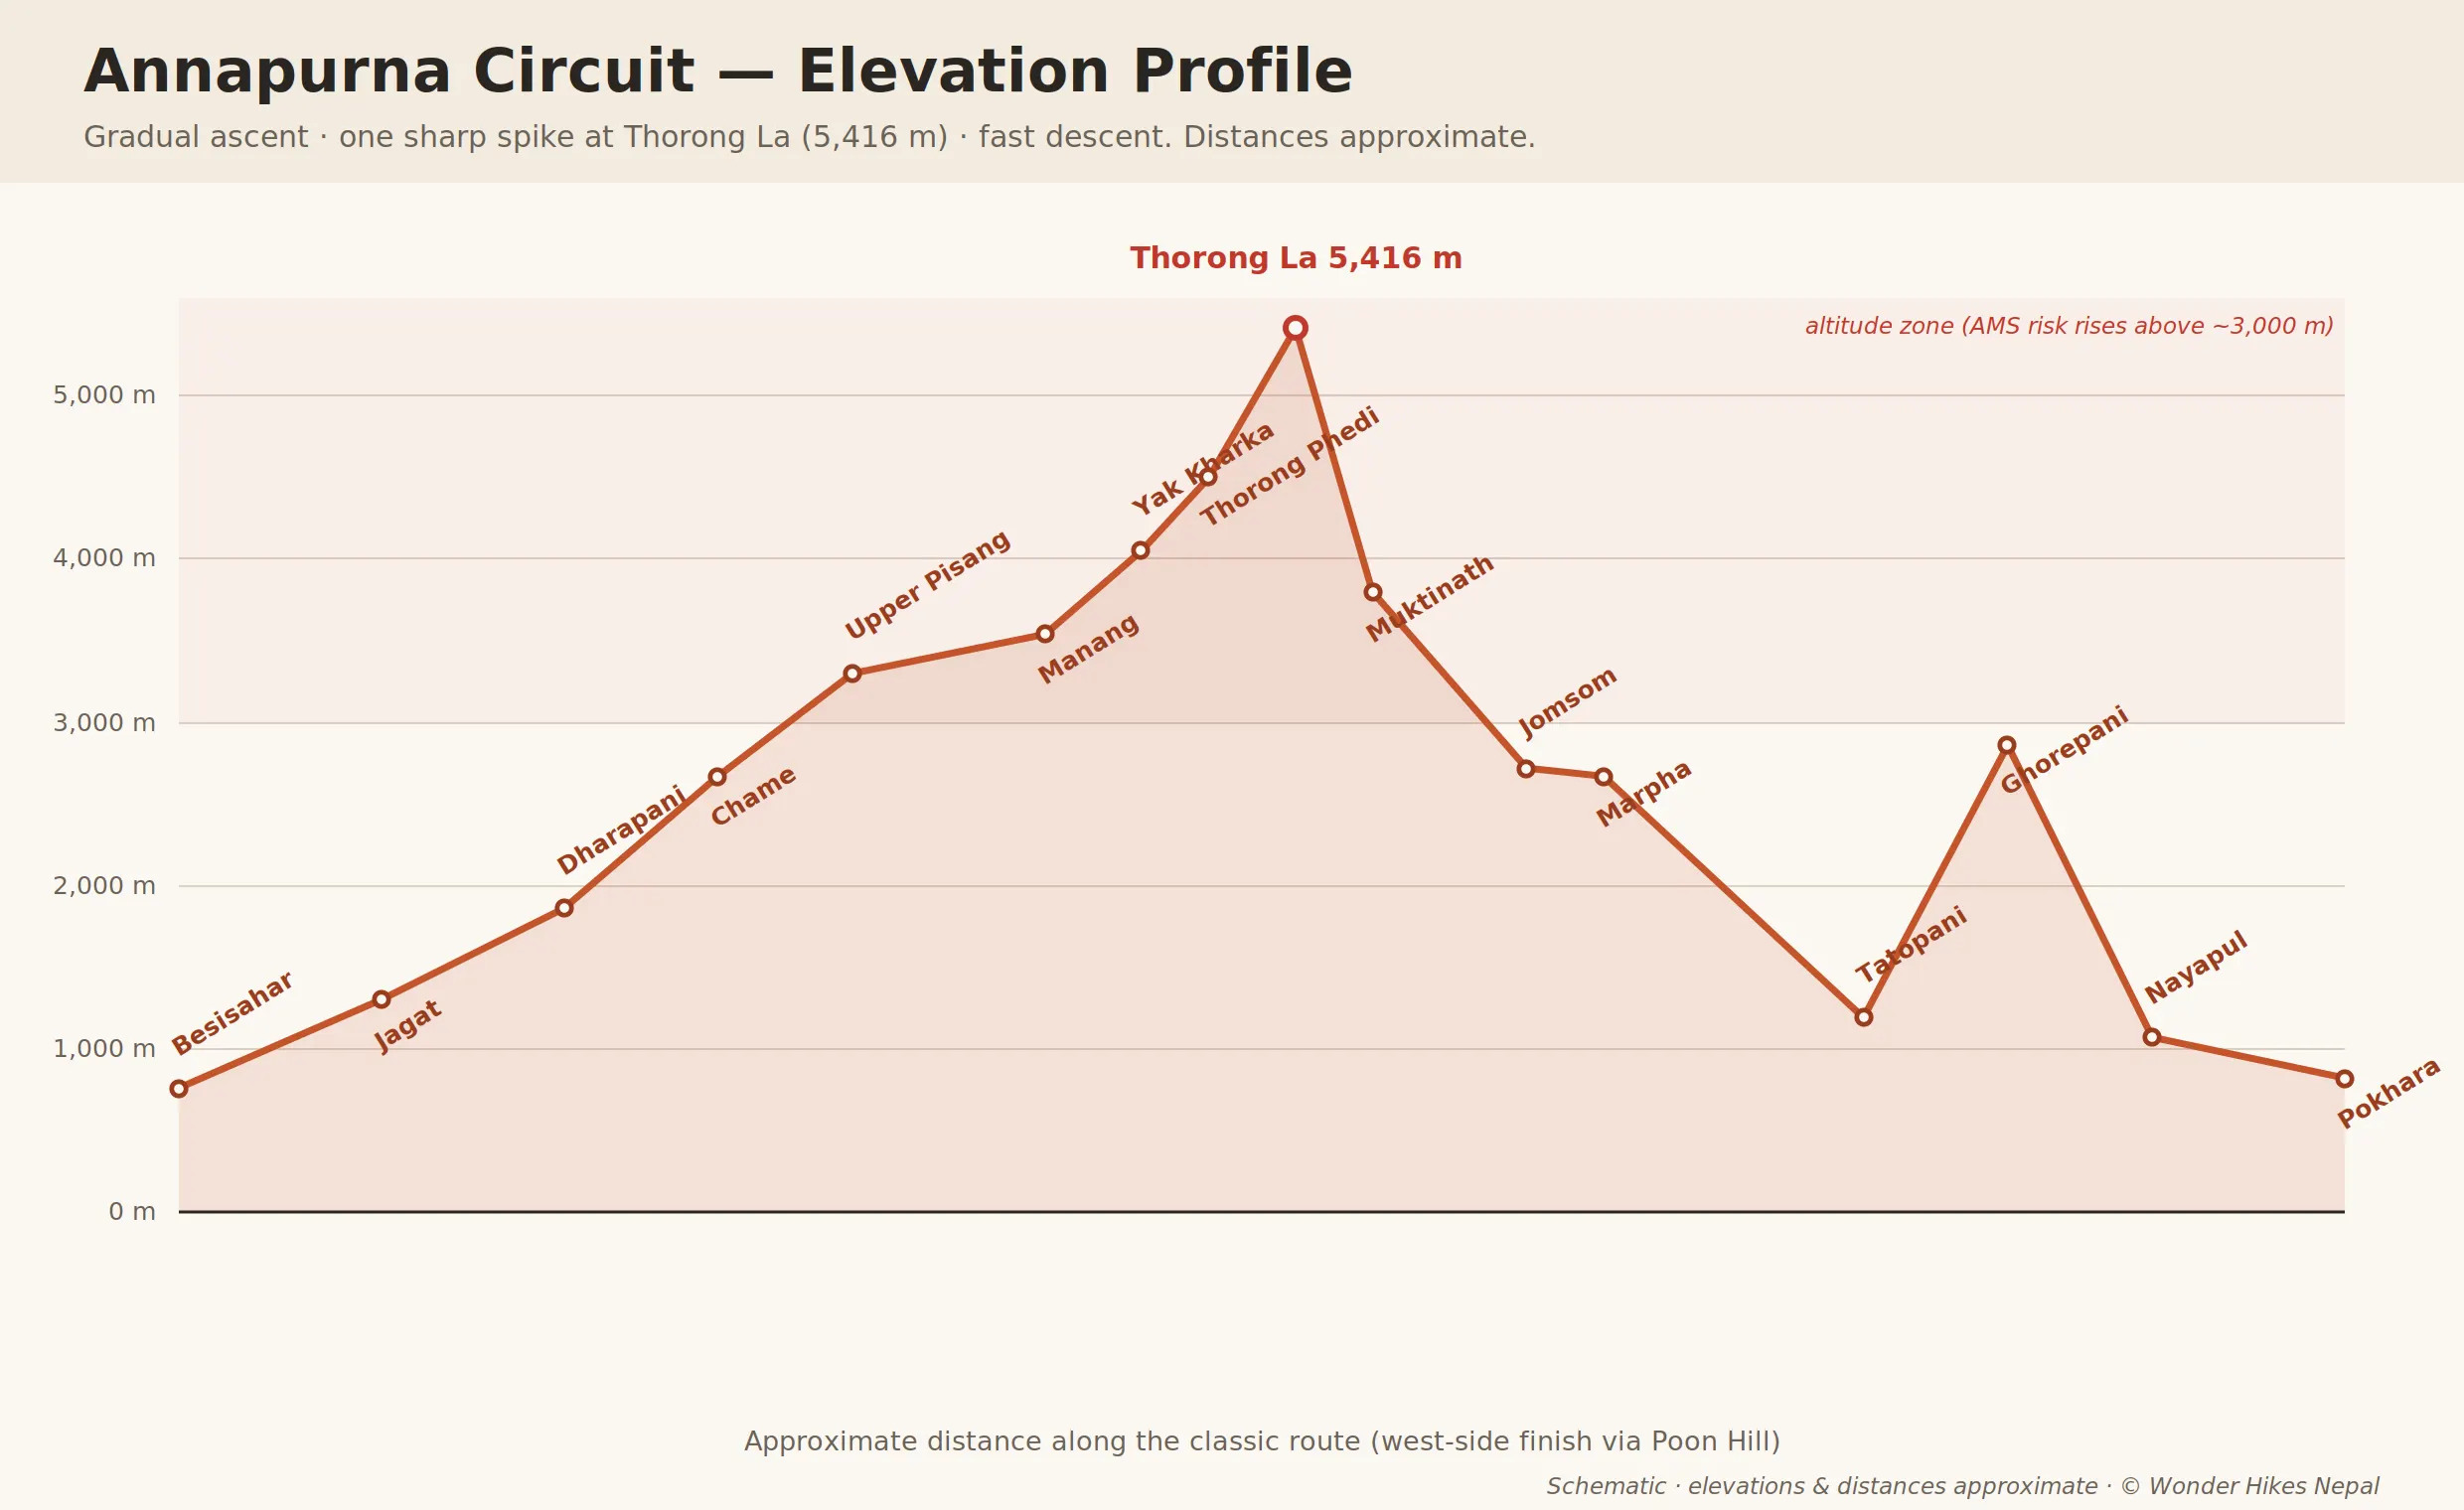
- The elevation profile. The best maps pair the route with a side-on altitude chart. This is where you spot the danger zones and plan acclimatisation.
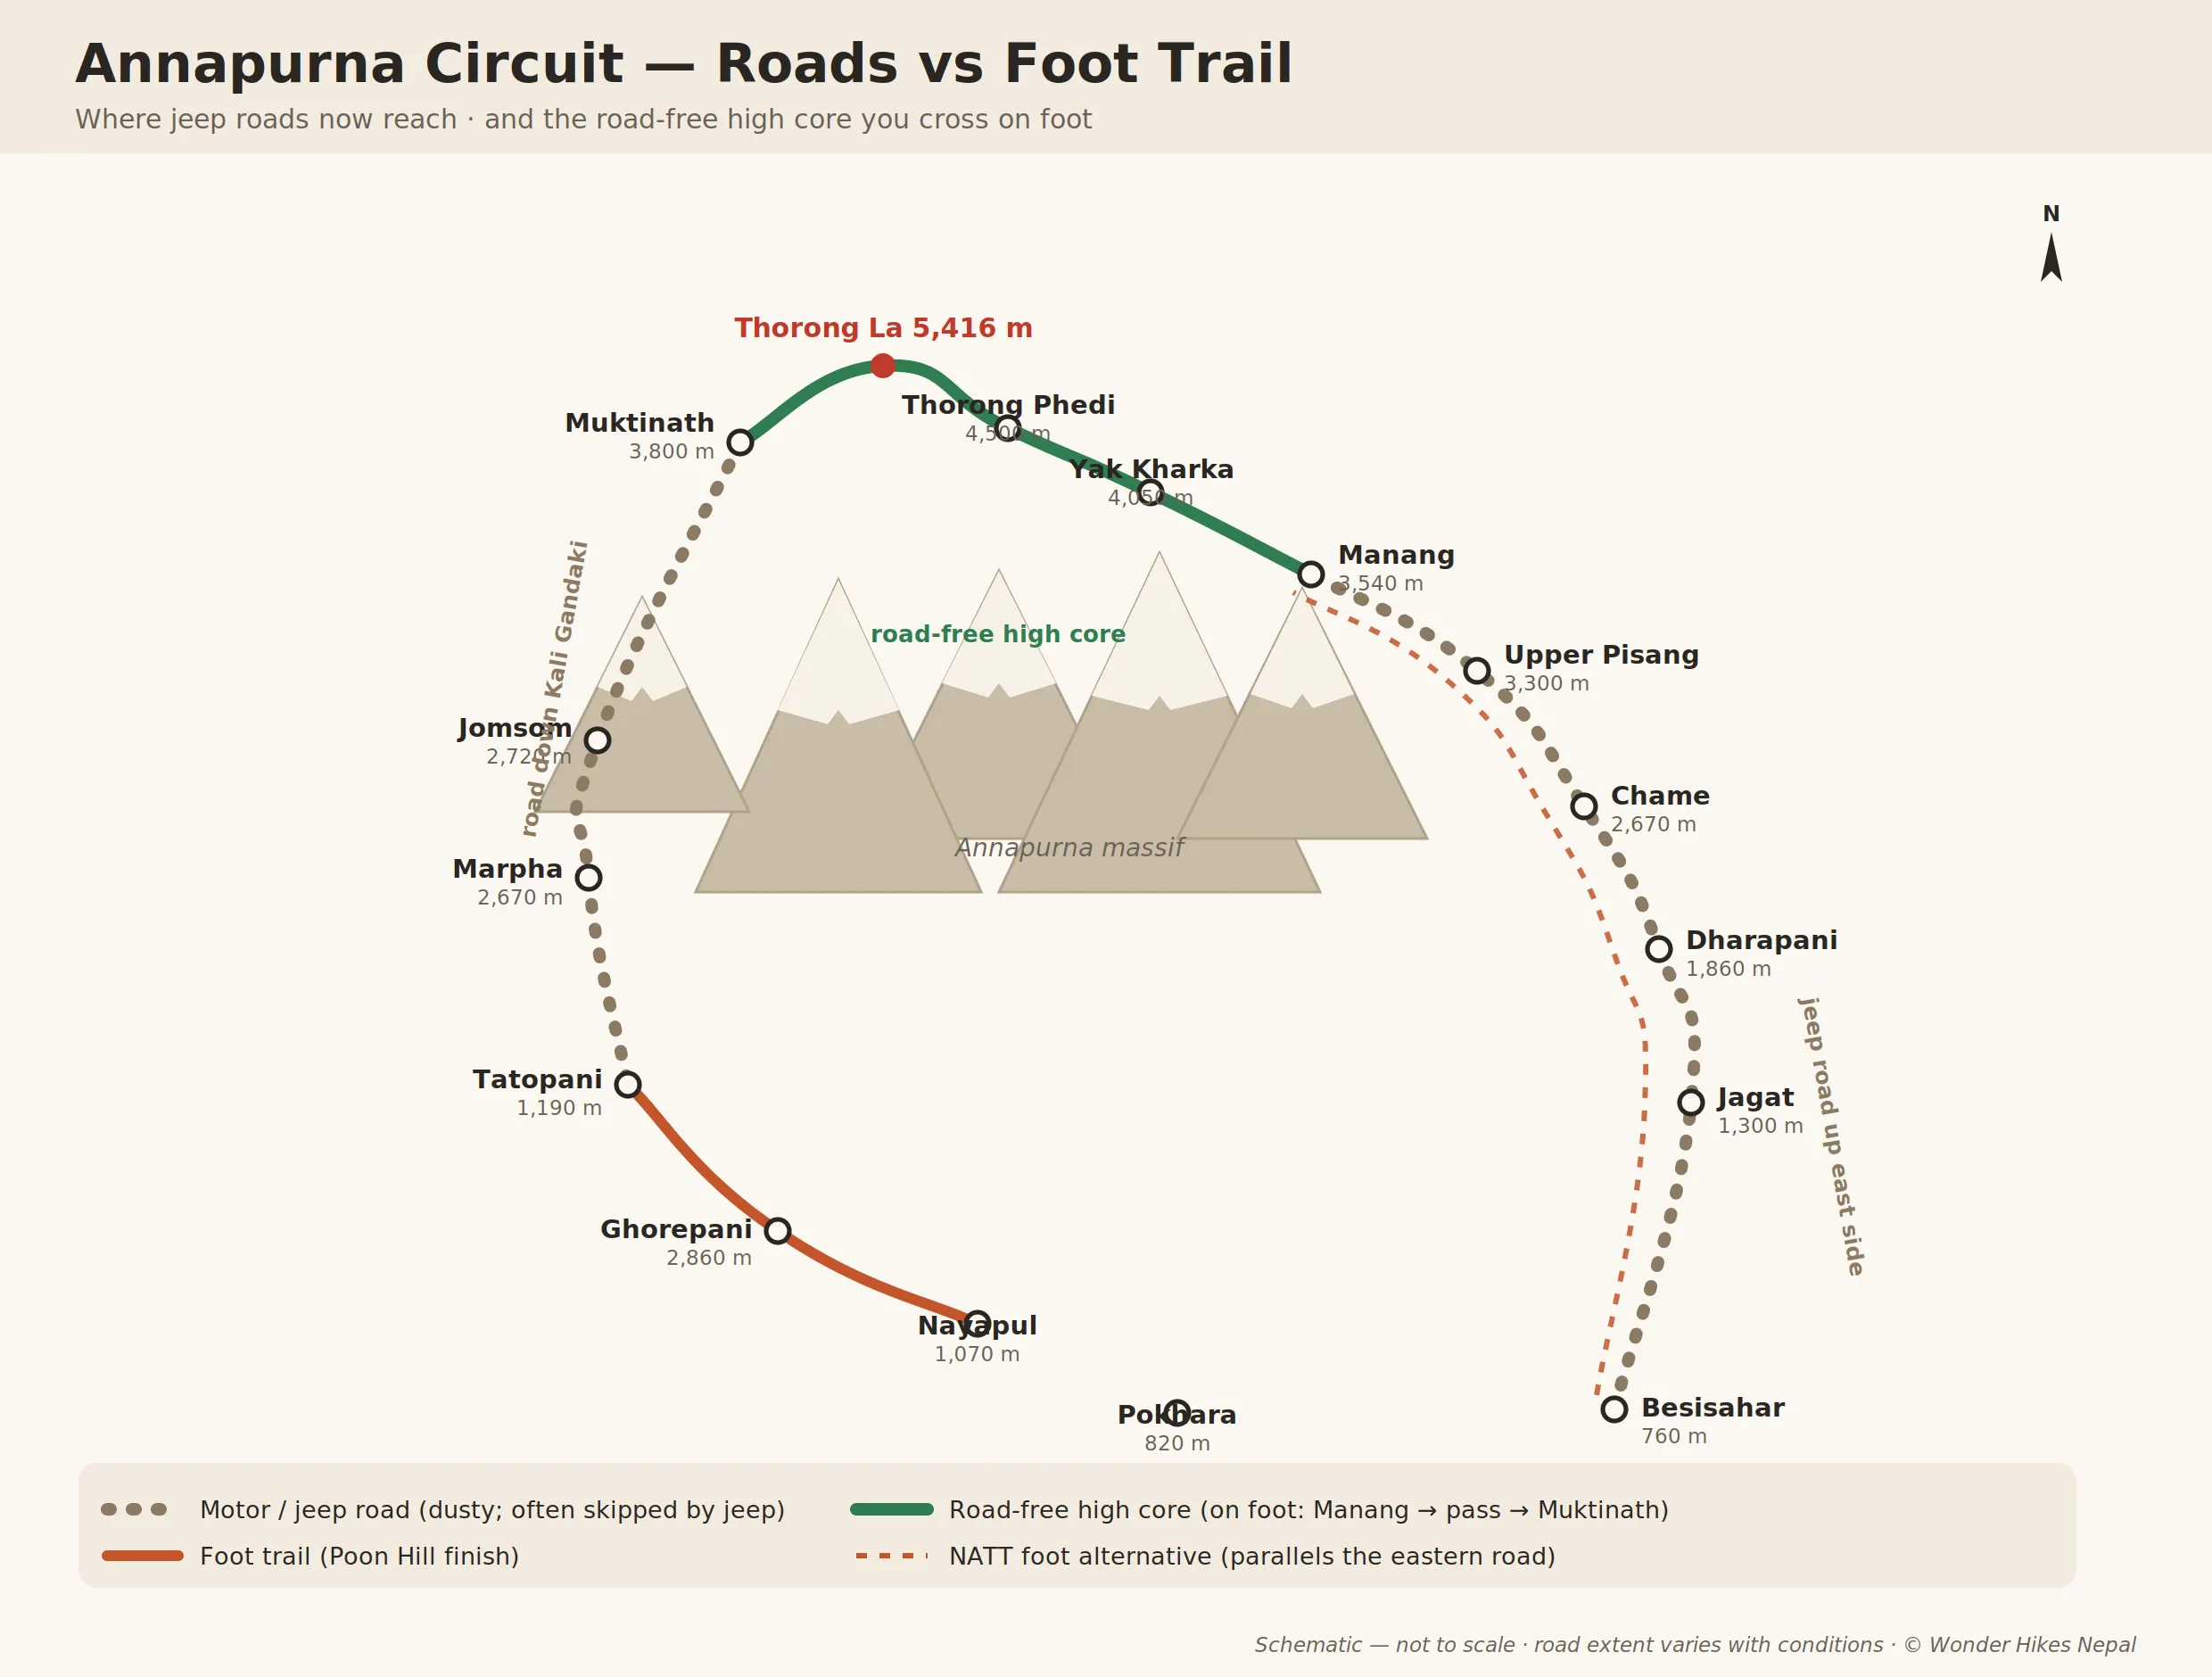
- Roads versus foot trails. Modern maps distinguish the motor road (dirt jeep track) from the walking trail and the alternative foot paths. This single distinction shapes the quality of your trek more than anything else today.
If your map does not separate road from trail, or does not include an elevation profile, it is out of date for planning purposes.
The route in order, with elevation and distance
The table below lists the classic clockwise route from Besisahar to the Kali Gandaki side. Elevations are drawn from multiple current sources and rounded; where sources disagree by a few dozen metres, a representative figure is used. Distances and walking times are approximate and shift with your exact start point, side trips, and how much of the road you cover on foot.
| Stage / village | Approx. elevation | Region | Notes |
|---|---|---|---|
| Besisahar | 760–820 m | Lamjung | Classic start; last town with reliable banking and full supplies |
| Bhulbhule | ~840 m | Lamjung | Common bus terminus; lower valley, warm and green |
| Jagat | ~1,300 m | Lamjung | Marsyangdi gorge begins; frequent jeep start point |
| Dharapani | ~1,860 m | Manang | Popular walking start after a jeep transfer; permit checkpoint |
| Chame | ~2,670 m | Manang | District headquarters; a widely recommended “start walking here” point |
| Upper Pisang | ~3,300–3,475 m | Manang | Choice of high (scenic) or low (easier) route to Manang |
| Ngawal | ~3,650 m | Manang | On the high route; excellent for acclimatisation |
| Manang | ~3,540 m | Manang | The key rest-and-acclimatise hub; do not skip a rest day here |
| Yak Kharka | ~4,050 m | Manang | Alpine terrain; recommended intermediate night for many |
| Ledar (Letdar) | ~4,200–4,250 m | Manang | Alternative sleep between Yak Kharka and Phedi |
| Thorong Phedi | ~4,450–4,540 m | Manang | Base of the pass; early starts from here |
| High Camp | ~4,800–4,850 m | Manang | Higher pass-eve option; shortens summit morning but sleeps higher |
| Thorong La Pass | 5,416 m | Manang/Mustang divide | Highest point of the trek |
| Muktinath | ~3,760–3,800 m | Mustang | Sacred site for Hindus and Buddhists; road accessible |
| Kagbeni | ~2,800 m | Mustang | Gateway village toward Upper Mustang |
| Jomsom | ~2,720 m | Mustang | Airport with flights to Pokhara; common finish point |
| Marpha / Tukuche / Larjung | ~2,600–2,700 m | Mustang | Kali Gandaki villages; apple orchards, Thakali culture |
| Ghasa | ~2,000 m | Mustang | Lower Kali Gandaki; road-linked |
| Tatopani | ~1,190 m | Myagdi | Hot springs; a natural end point or a bridge to Poon Hill |
| Ghorepani | ~2,860 m | Myagdi/Kaski | Base for the Poon Hill sunrise viewpoint |
| Poon Hill (viewpoint) | ~3,210 m | Kaski | Panorama of Dhaulagiri, Annapurna South, Machhapuchhre |
| Nayapul / Birethanti | ~1,000 m | Kaski | Traditional foot finish near Pokhara |
| Pokhara | ~820 m | Kaski | Trek hub; where most people rest afterward |
Reading down that column tells you the real story of the trek: a long, uneven climb over roughly ten to twelve days, one sharp spike at Thorong La, and then a fast drop that loses most of your hard-won altitude in the first two days after the pass.
How far is the Annapurna Circuit, really?
There is no single correct distance, and any map that gives you one exact number is oversimplifying. The honest answer is a range that depends on where you start walking and where you stop.
- Modern, jeep-assisted circuit (typical today): roughly 130–180 km (about 80–112 miles) on foot, because most trekkers now drive past the lower road sections.
- Fuller classic route walked start to finish: roughly 160–230 km, if you walk from Besisahar and continue on foot to Nayapul rather than driving or flying out.
Distances vary for defensible reasons: your exact start point (Besisahar, Jagat, Dharapani, or Chame), whether you take the high or low route between Pisang and Manang, whether you add Tilicho Lake or Poon Hill, and whether GPS was tracking the trail or the road. Treat any per-day distance as a planning guide, not a promise.
It also helps to keep four different measurements separate, because maps and blogs mix them constantly:
- Elevation — how high a point is above sea level (e.g. Manang at ~3,540 m).
- Elevation gain — how much you climb. Across the full circuit this totals roughly 7,000+ vertical metres, far more than the net profile suggests, because the trail keeps dropping into gorges and climbing back out.
- Walking distance — kilometres actually covered on foot.
- Road / drive distance — the much longer figures you see for jeep and bus transfers (for example, Kathmandu to Besisahar is a 6–8 hour drive).
The elevation profile: where the trek gets serious
If you only study one part of the map, make it the elevation chart. The circuit is not a steady ramp. It undulates the whole way, then delivers its one genuine altitude challenge near the end of the ascent.
- Below 2,500 m (Besisahar to Chame): warm, green, forested. This is your legs-and-lungs warm-up, and it doubles as physiological preparation even if you find it less dramatic than the high country.
- 2,500–3,500 m (Chame to Manang): the scenery opens into big Himalayan views. The air starts to thin. This is where acclimatisation begins in earnest.
- 3,500–4,500 m (Manang to Thorong Phedi): the high-altitude zone. Acute Mountain Sickness (AMS) risk rises quickly above 3,000 m and faster again above 4,000 m. Rest days and steady pacing matter here more than fitness.
- Pass day (Phedi/High Camp to Thorong La to Muktinath): the crux. From Thorong Phedi you climb nearly 1,000 vertical metres to the pass, then descend more than 1,600 m to Muktinath — one of the longest, hardest single days on the trek.
A minimum of one full rest day at Manang is close to non-negotiable, and two are wise if you have never been above 4,000 m. Many experienced operators also build in an extra night at Yak Kharka before the pass.
Section-by-section: how the route unfolds
Lower Marsyangdi valley (Besisahar to Dharapani)
This is the subtropical opening: terraced fields, rice paddies, waterfalls, and suspension bridges over the Marsyangdi. It is also the section most affected by the road, which is why so many trekkers now jeep through it. The gorge stretches between Tal and Dharapani still reward walking; the flatter road near Bhulbhule and Ngadi are the parts most people are happy to skip.
Into the high valley (Dharapani to Manang)
From Chame the trek starts to feel like the “real” Annapurna Circuit. Pine forest gives way to a drier, more dramatic landscape below Annapurna II and the Chulu peaks. Between Pisang and Manang the map offers a genuine choice:
- Upper (high) route via Ghyaru and Ngawal — harder, higher, and far better for both views and acclimatisation.
- Lower route via Humde and Braga — gentler and faster, following the valley floor.
If your legs and your acclimatisation allow it, the high route is the better decision, and the extra height you sleep at helps prepare you for the pass.
The acclimatisation hub (Manang)
Manang is the strategic centre of the whole trek. It has lodges, bakeries, a small clinic that runs altitude talks in season, and — crucially — good day hikes that let you climb high and sleep low. Popular acclimatisation options nearby include the Ice Lake (Kicho Tal) and Gangapurna Lake. Spend the rest day here actively; do not lie in bed all day.
The high approach and Thorong La (Manang to Muktinath)
Above Manang the trail climbs steadily through Yak Kharka and Ledar to Thorong Phedi, and optionally to High Camp. Vegetation all but disappears; the terrain turns to rock and scree. Pass day starts in the dark — usually between 3 and 5 a.m. — to reach Thorong La before the wind picks up. The climb is long rather than technical: no ropes or climbing gear, but real, sustained effort at extreme altitude. From the pass, the descent to Muktinath is steep and hard on the knees but drops you into a completely different world — the arid, Tibetan-influenced Mustang region.
The Kali Gandaki descent (Muktinath to Pokhara)
Past Muktinath the map shifts character. You are now in a broad, wind-scoured, rain-shadow valley below Dhaulagiri, walking (or driving) down the Kali Gandaki — one of the deepest gorges on Earth — through Thakali villages like Marpha and Tukuche, famous for apples and orchards. From here you choose how to finish, and the map gives three realistic exits (covered below).
Where the road changed the Annapurna Circuit Trek Map (and what to do about it)
This is the single most important thing modern maps get right and older ones get wrong. Over the past two decades, road building has reached deep into the circuit. A rough motorable jeep track now runs from Besisahar up the eastern side toward Manang, and on the western side a road runs from Muktinath down through Jomsom and the Kali Gandaki to Tatopani and Beni. Journeys that once took days of walking can now be driven in hours.
That does not ruin the trek — the mountains, the villages, and Thorong La are all still there, and traffic on most of the trail is light. But it does change how you plan. There are three practical responses, and a good map helps you choose:
- Start higher to skip the road. Most trekkers now bus to Besisahar, then take a jeep to Jagat, Dharapani, or Chame and start walking there. Chame is a common piece of advice for keeping road-walking to a minimum while preserving the best scenery.
- Use the New Annapurna Trekking Trails (NATT). These are alternative foot trails, marked in red-and-white paint, developed to keep trekkers off the road while staying close to the classic route. They are quieter and kinder underfoot, though signposting can be patchy and some variants add time. A local guide is genuinely useful for following them, because landslides and new detours are not always on the map.
- Finish smart. After the pass, decide how much of the western road you want to walk.
Three common finishes from the Kali Gandaki side:
| Finish option | What it involves | Best for |
|---|---|---|
| Fly from Jomsom to Pokhara | 20–25 min flight; morning departures only (afternoon winds cause cancellations) | Trekkers short on time |
| Walk to Tatopani, then drive | Descend the Kali Gandaki on foot/trail, soak in the hot springs, bus out | A restorative, road-light finish that skips Poon Hill |
| Continue on foot to Ghorepani/Poon Hill, then Nayapul | Adds several days and the classic Poon Hill sunrise | Those who want the fullest circuit on foot |
Side trips worth adding to the map
A well-planned circuit often includes one or two detours that many maps mark but few trekkers understand:
- Tilicho Lake (~4,919 m): a stunning high-altitude glacial lake reached via Khangsar and Tilicho Base Camp (~4,150 m). It adds roughly two to four days and its own acclimatisation demands, and the approach traverses landslide-prone slopes — worthwhile, but not a casual add-on.
- Ice Lake / Kicho Tal (~4,600 m): a superb acclimatisation day hike from Braga or Manang, climbing high and returning to sleep low.
- Ghorepani–Poon Hill (viewpoint ~3,210 m): the classic sunrise panorama, usually tacked onto the very end if you walk out the southern route.
Only add a side trip if your itinerary has room for the extra acclimatisation it requires. Height gained too fast is the fastest way to end a trek early.
Itinerary variations: reading the Annapurna Circuit Trek Map for time
Because roads let you start and finish in several places, the circuit is really a family of itineraries rather than one fixed schedule. Use the map to match the route to the days you have.
| Version | Rough duration | Typical shape |
|---|---|---|
| Short circuit | 8–11 days | Jeep to Chame, walk to Muktinath over Thorong La, fly out from Jomsom |
| Standard circuit | 12–14 days | Walk from Dharapani/Chame, rest in Manang, cross the pass, finish at Jomsom or Tatopani |
| Full classic + Poon Hill | 15–18 days | More of the trek on foot, ending via Ghorepani and Poon Hill to Nayapul |
| Circuit + Tilicho Lake | 16–20 days | Standard route with the Tilicho detour and extra acclimatisation |
There is no “best” version in the abstract — only the version that fits your time, fitness, and appetite for road-free walking.
Permits and rules for 2026
Regulations in the Annapurna region have changed more than once in recent years, so verify the current position before you travel. As of 2026, the essentials are:
- Annapurna Conservation Area Permit (ACAP) — the one entry permit every trekker needs for the circuit. It costs NPR 3,000 for foreign nationals and NPR 1,000 for SAARC nationals; children under 10 are exempt. It is issued by the National Trust for Nature Conservation and is checked at multiple points (Besisahar, Dharapani, Chame, Manang, Jomsom and others). Carry a printed copy — a phone screenshot is not always accepted, and buying at a checkpoint typically costs double.
- TIMS card — this is where online information conflicts. Some 2026 operators report that the TIMS card is no longer enforced on the standard circuit, while others still issue it (around NPR 2,000). Because the rule has shifted, confirm the current requirement with the Nepal Tourism Board or a registered agency before you go.
- Guide requirement — reporting for 2026 indicates that fully independent solo trekking is not permitted in the Annapurna Conservation Area, and that trekkers are expected to go with a licensed, government-registered guide arranged through a registered agency. This too has been subject to change and local interpretation, so confirm it directly before finalising plans.
- Restricted areas — side routes into Upper Mustang and Nar-Phu require a separate, more expensive Restricted Area Permit that only a licensed agency can process. The standard circuit does not enter these zones.
Reading the map on the trail: practical navigation
The Annapurna Circuit is well travelled and generally well marked, but a few habits keep you on track:
- Follow the wider, more worn trail at ambiguous junctions, and confirm the next village with teahouse staff or other trekkers.
- On the high Pisang–Manang route, stay high on the ridge when in doubt rather than dropping toward the valley floor.
- Watch for NATT red-and-white markers if you are deliberately avoiding the road.
- Carry a printed map as backup. Digital apps with offline maps and GPS (downloaded before you lose signal) are excellent for real-time position and elevation, but batteries drain fast in the cold at altitude. A paper map does not run out of power.
- Cross-check elevations and distances across sources; small discrepancies are normal and rarely matter on the ground.
Difficulty, altitude and staying safe
The Annapurna Circuit is a demanding but non-technical trek. You do not need mountaineering skills, but you do need reasonable fitness, patience with altitude, and sensible pacing. The real risk is not the terrain — it is going up too fast.
A few responsible, non-medical principles the map supports:
- Ascend gradually. The lower stages are not filler; they prepare your body.
- Respect the Manang rest day, and consider an extra night before the pass.
- Use “climb high, sleep low” on rest days.
- Hydrate hard (three to four litres a day above 3,000 m) and avoid alcohol on the ascent.
- Know the warning signs of AMS — persistent headache, nausea, dizziness, breathlessness at rest — and understand that the only reliable treatment is to stop ascending and, if symptoms worsen, descend.
This is general information, not medical advice. Anyone with health conditions, and every trekker before pass day, should get proper medical guidance and travel with a guide who can make altitude calls. If in doubt, go down — the pass will still be there next season.
Best seasons to read into your plan
Two windows dominate the circuit, and they change what the map means for you:
- Autumn (late September to November): the most popular season — stable weather, clear mountain views, and reliable pass crossings. Busier trails and lodges.
- Spring (March to May): warm days, rhododendron blooms lower down, and generally good conditions, with more haze than autumn.
Winter brings snow and a real risk of Thorong La closing; the monsoon (June to early September) makes the eastern side wet and leech-prone, though the Mustang rain shadow stays drier. Plan pass day for the clearest, calmest window you can.
Planning your circuit with Wonder Hikes Nepal
Once the map makes sense, the decisions that remain are practical: where to start walking, whether to take the high route to Manang, how many acclimatisation days to build in, and how to finish. Those choices are exactly where local knowledge earns its place — knowing which NATT variants are currently walkable, where a recent landslide has moved the trail, and how to pace the pass for your group.
Wonder Hikes Nepal builds Annapurna Circuit itineraries around your available days and fitness, handles permits, and pairs you with licensed guides who read these trails month after month. If you want a route plan tailored to your dates, that is a sensible next step after this map.
Frequently asked questions about Annapurna Circuit Trek Map
1. Where does the Annapurna Circuit start and finish? The classic start is Besisahar (~760–820 m) in Lamjung, though most trekkers now jeep on to Jagat, Dharapani, or Chame to skip the lower road. The finish is on the Kali Gandaki side — commonly Jomsom (fly out), Tatopani (bus out), or Nayapul via Poon Hill (on foot).
2. How high is Thorong La Pass? Thorong La sits at 5,416 m (17,769 ft), the highest point of the trek and one of the highest regularly crossed trekking passes in the world. It is non-technical but physically demanding at that altitude.
3. Which direction should I trek — clockwise or counter-clockwise? Clockwise (up the Marsyangdi, over Thorong La, down the Kali Gandaki) is standard. It gives a safer, more gradual altitude profile. Counter-clockwise means a much longer, steeper climb to the pass and is rarely recommended.
4. How long does the Annapurna Circuit take? Anywhere from about 8 to 18 days, depending on where you start and finish and whether you add side trips. A short jeep-assisted circuit runs 8–11 days; a fuller classic route with Poon Hill runs 15–18.
5. How far is the trek in kilometres? Roughly 130–180 km on foot for a modern jeep-assisted circuit, and up to about 160–230 km if you walk the fuller classic route start to finish. Distances vary with your exact start point and side trips.
6. Has the road ruined the Annapurna Circuit? No. A jeep track now reaches up the eastern side toward Manang and down the western side from Muktinath, but the high country, the villages, and Thorong La are unchanged. Starting higher (e.g. Chame) and using the NATT foot trails keeps you off the road for the best sections.
7. What are the NATT trails? The New Annapurna Trekking Trails are marked alternative foot paths (red-and-white blazes) that keep trekkers close to the classic route while avoiding the road. They are quieter and easier on the knees, though signposting can be inconsistent.
8. Where should I take my acclimatisation rest day? Manang (~3,540 m) is the standard rest hub, with good “climb high, sleep low” day hikes to Ice Lake or Gangapurna Lake. Take at least one full rest day here, and consider a second if you have not been above 4,000 m.
9. Can I shorten the trek? Yes. The most common shortcuts are jeeping from Besisahar to Chame at the start, and flying from Jomsom to Pokhara at the end. You still cross Thorong La and see the full scale of the Annapurna and Dhaulagiri ranges.
10. Can I add Tilicho Lake to the circuit? Yes. Tilicho Lake (~4,919 m) is reached via Khangsar and Tilicho Base Camp and adds roughly two to four days plus extra acclimatisation. The approach crosses landslide-prone slopes, so plan it carefully rather than as a casual detour.
11. What permits do I need in 2026? The ACAP (NPR 3,000 for foreign nationals, NPR 1,000 for SAARC) is the core entry permit. Rules around the TIMS card and the mandatory-guide requirement have changed recently and are reported inconsistently, so confirm the current position with the Nepal Tourism Board or a registered agency before you travel.
12. Do I need a guide, or can I trek solo? Current 2026 reporting indicates that independent solo trekking is not permitted in the Annapurna Conservation Area and that a licensed guide arranged through a registered agency is expected. Because this rule has shifted and is interpreted locally, verify it directly before planning a solo trip.
13. Which is better — the high or low route between Pisang and Manang? The high route via Ghyaru and Ngawal is harder but offers far better views and superior acclimatisation. The low valley route is faster and gentler. If your legs and acclimatisation allow, take the high route.
14. When is the best time to do the trek? Autumn (late September–November) and spring (March–May) are the two prime windows. Autumn offers the clearest views; spring brings warmth and rhododendrons. Winter risks the pass closing, and the monsoon makes the eastern side wet.
15. Should I use a paper map or a phone app? Use both. A downloaded offline app gives real-time GPS position and elevation, but cold drains batteries fast at altitude. A printed map is your reliable backup and is also what checkpoints and teahouse staff can read with you.